I've compiled these notes on authentication implementation based on my experiences working with various systems and architectures. These observations cover the key aspects I've found important when implementing authentication in web applications, from request routing strategies to the evolution of protocols like OAuth and OpenID Connect, to practical implementation options. While not exhaustive, these notes reflect approaches and patterns I've found valuable in real-world scenarios. I hope these implementation insights prove useful whether you're designing a new system or evaluating options for an existing one.
Request Routing Strategy and Cross-Cutting Concerns
Request routing is the strategy of how to forward requests arriving in your system to the appropriate backend microservice or endpoint that processes the requests. These are the three fundamental request routing patterns:
- Direct Routing
- Proxy Routing (Reverse Proxy)
- Forward Routing
I think the proxy routing strategy is the most interesting. A proxy is a network layer that sits in front of our APIs and it's main role is to intercept and forward incoming requests to the appropriate server based on request URL, which is also called "service discovery".
When it comes to adding authorization to APIs there're two major strategies: handling validation in a proxy, or handling validation in each service. In both cases, middleware - a layer of code that provides common functionality to process all incoming requests - is typically used to implement the validation logic. Most web servers have a concept of middleware or request preprocessors. Middleware components are usually executed in order, and typically we can choose the order in which they're executed.
If validation is handled within each individual service, the service's middleware chain handles the validation. Since authorization controls access to our server, the authorization middleware must be executed early in the chain.
The other approach is to centralize validation in our proxy, where the middleware processes and validates requests before forwarding them. The backend services behind the proxy then receive pre-authenticated requests. While the backend services could validate the token again, they typically don't need to since they trust the proxy.
OAuth and OpenId Connect (OIDC)
When implementing these validation strategies, the two most important protocols you need to know are OAuth (Open Authorization) and OpenID Connect (OIDC). In order to understand these two protocols, we have to understand the historical context and problems that OAuth was created to solve.
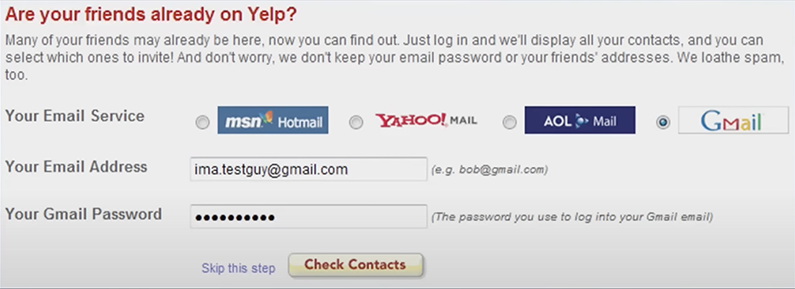
Before OAuth, a common but problematic pattern was that third-party applications would ask users to share their username and password to perform tasks on their behalf. A classic example that led to OAuth's creation was Yelp's integration with popular email providers back in the the 2000's. As a way of improving the user experience, Yelp had this feature where the users would be able to connect with their email contacts on Yelp, but the user was requested to share their email address and password, granting Yelp full permissions to their email account.
The OAuth protocol was created to solve these problems by introducing a secure delegation protocol. Instead of sharing credentials, OAuth allowed users to grant specific permissions (scopes) to third-party applications in order to control what resources they could access.
Then in 2009 the "Login with Facebook" button was introduced followed by the Login with Google button and similar buttons by many other companies like Twitter, Microsoft, and LinkedIn. Companies started using OAuth for authentication even though OAuth 2.0 was not designed to be used for authentication. Essentially, OAuth 2.0 was being used beyond for its purpose of delegated authorization.
However, using OAuth for authentication is bad practice because there is no way of getting user information in OAuth. If you log in to an app with OAuth 2.0, there is no way for that app to know who just logged in or other information like your email address and name. OAuth 2.0 is designed for permissions scopes. All it does is verify that your access token is scoped to a particular resource set. It doesn't verify who you are.
When the various companies built their social login buttons, using OAuth under the hood, they all had to add custom hacks on top of OAuth to allow clients to get the user's information. If you read about these various implementations, keep in mind that they are different and not interoperable.
To address this lack of standardization, OpenID Connect was created as a standard for adopting OAuth 2.0 for authentication. OpenID Connect is a thin layer on top of OAuth 2.0 that allows it to be used for authentication.
Implementing Auth: Self-Built, Self-Hosted, and SaaS
While OAuth 2.0 and OpenID Connect provide the protocols for authentication and authorization, when it comes to implementing these protocols in your application, there are three main approaches to implementing authentication:
-
Application-embedded Solutions
- Using authentication libraries within your application backend
- Examples: Passport.js, Spring Security, Django Authentication
- You manage everything: user data model, database, token issuance
- Suitable for single applications with simple auth needs
- This ties back to our earlier discussion of "handling validation in each service"
-
Self-hosted Auth Servers
- Standalone authentication servers you deploy and maintain
- Examples: Keycloak, OpenIAM
- Centralized auth for multiple applications
- You manage the server infrastructure but not the auth implementation
- Suitable when you need control over infrastructure or data locality
-
Identity-as-a-Service (IDaaS)
- Fully managed authentication services
- Examples: Auth0, Okta, Clerk
- No infrastructure management needed
- Provider handles everything: updates, scaling, security
- Suitable when you want minimum operational overhead
Authentication Flow Implementation
Here is the authentication flow that we wanna implement for our application:
- User initiates login with social identify provider (i.e. Google) which is the only available type of authentication that our application allow. We only want to do authentication, and have no need for additional Google resource access.
- Proxy/API Gateway forwards to our centralized identity and access management service (IAM service) that is either self-hosted (i.e. OpenAuth, Keycloack) or SaaS (Clerk, Auth0). The IAM service has been pre-configured with Google credentials.
- The IAM service handles the OAuth/OIDC flow with Google. IAM acts as the "client" application in the OAuth flow. It is only interested in receiving the 'openid' scope from Google.
- After successful authentication, user is redirected back to our app with a JWT token that is issued by our IAM service. This is a new token issued by our IAM, not Google's token, and it contains user information that is signed by our IAM.
- User includes JWT in subsequent requests. Typically in Authorization header. Bearer token format.
- Proxy/API gateway validates JWT using JWKS. Proxy fetches public keys from IAM's JWKS endpoint. Validates token signature. Checks token claims (expiration, issuer, etc.). If valid, forwards request to appropriate service.
Understanding OAuth Roles in the Flow
Let's break down who/what are the authorization server, the resource server, and the client application in the described flow. There are actually two OAuth/OIDC flows happening:
First Flow (Social Login with Google):
- Authorization Server: Google
- Client Application: Your service (Keycloak/Auth0)
- Resource Server: Google (but we don't access resources since we only want authentication)
- Resource Owner: The end user
Second Flow (Within Your System):
- Authorization Server: Your IAM service (Keycloak/Auth0)
- Client Application: Your frontend application
- Resource Server: Your backend services (behind the API gateway)
- Resource Owner: The end user
This is an important distinction because:
- Your IAM service acts as a client when talking to Google
- But then acts as an authorization server when issuing tokens for your system
- Your frontend application is the client that receives tokens from your IAM
- Your API gateway validates tokens issued by your IAM service
- Your backend services trust tokens validated by the API gateway
In our architecture the IAM is primarily an Authorization Server - that's its main role in our architecture. The client role it plays with Google is just to facilitate social login, but its core responsibility is being an Authorization Server for our system. Think of it this way:
- The IAM acts as a client to Google briefly just to handle social login
- But for all subsequent interactions in your system (which will be the majority):
- It issues tokens
- It validates tokens
- It manages user sessions
- It handles token refresh
- It manages user information
- It provides JWKS endpoints
- It handles token revocation
These are all Authorization Server responsibilities. The client role with Google is just one small part of its functionality, necessary to support social login as an authentication option.
This is why solutions like Auth0, Okta, and Keycloak are called Identity and Access Management servers or Authorization Servers - because that's their primary purpose, even though they can also act as clients to other auth providers when needed for social login integration.
The client role is more like a feature they support rather than their core identity in the system.
Conclusion
The journey to implementing robust authentication in your applications requires understanding both the underlying protocols and architectural patterns. We've explored how request routing strategies like proxy routing can centralize authentication concerns, the evolution from OAuth to OpenID Connect for standardized authentication, and the spectrum of implementation options from application-embedded libraries to fully managed SaaS solutions.
When selecting your authentication approach, consider your specific requirements around control, scalability, compliance, and development resources. For smaller projects or teams with limited resources, IDaaS solutions like Auth0 or Clerk offer the quickest path to robust authentication. For organizations with specific compliance needs or those requiring complete control over user data, self-hosted solutions like Keycloak may be more appropriate.
Remember that authentication is not a "set and forget" component—it requires ongoing maintenance to address emerging security threats and evolving best practices. Whichever approach you choose, prioritize security fundamentals like proper token validation, secure storage, regular updates, and comprehensive testing.
By thoughtfully implementing the patterns and protocols discussed in this post, you'll create a solid foundation for your application's security, allowing you to focus on building features that deliver value to your users while maintaining their trust in your system's ability to protect their information.